Sunday, July 21, 2013

How to Create Wireless Ad hoc / Access Point in Windows 8

In windows 8 creating ad hoc or access point is not available in the OS, but there is a paid app in Windows App store called Wi-Fi Hotspot Creator Assistant. But no need to purchase this app to create a new Wi-Fi hotspot, because the creating an Ad Hoc is still available inside the core of the Windows, but it’s not available in GUI.

Here are the steps to create an Ad Hoc network.

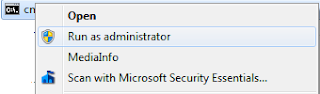
  1. First open up the windows command prompt with administrator privileges. To do so search for “cmd” and right-click on it then select run as administrator from below options.

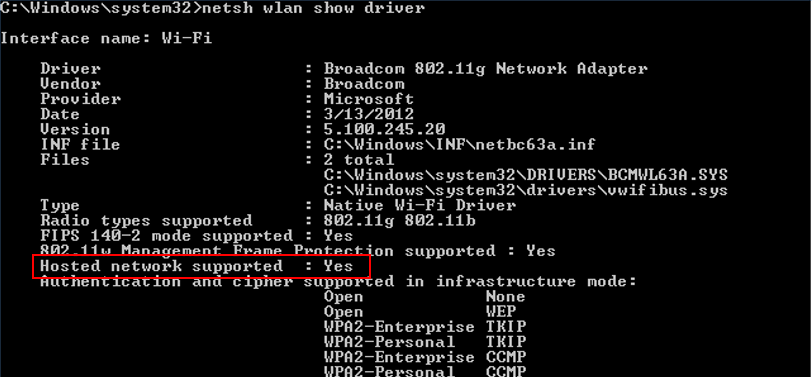
  2. Then you have to check whether the network card supports ad hoc networks to do soo run this command >netsh wlan show driver, then look at line Hosted network support

    If your network car support ad hoc then proceed with next step.

  3. Now enter following command line. Note: change the markup tags as your wish.

    netsh wlan set hostednetwork mode=allow ssid=<enter_ name_for_network>key=<enter_passowrd_here>
    • ssid- Name of the network
    •  key- passcode
  1. As the final step to start the connection enter this command netsh wlan start hostednetwork. Now you have done with creating ad hoc network
    If you having problem with starting the connection, just go to the Device manage and check whether the virtual wifi adapter is enabled under Network adapters.
    This wi-fi hotspot can be used to share the internet connection. 

    You can simply use this bat file to create a connection- Download here 

Wednesday, February 20, 2013

Replaces invalid XML characters in a string with their valid XML equivalent


Sometimes when creating XML documents with user specific data, string values of the XML nodes have to be encoded to maintain the structure of the XML nodes. Following table shows invalid XML characters and their escaped equivalent.

Invalid XML Character
Escaped equivalent
“<”
"<"
“>”
">"
“\””
"""
“\’”
"'"
“&”
“&"


There is a build-in method in .NET to achieve this called SecurityElement.Escape under the system. Security namespace.  This method accept string parameter and returns a string with invalid characters replaced.

e.g :-
      string xml = "\"node\"&"; 
      string encodedXml = System.Security.SecurityElement.Escape(xml);
      //RESULT: <node>"node"&<node>


Tuesday, February 19, 2013

How to encode JavaScript string to escape characters such as single quotes in .NET


When registering JavaScript functions or calling JavaScript functions from code behind there might me some specials characters such as single quotes, new line characters. These kinds of characters will causes for errors such as ” Unexpected identifier” , “Unterminated String constant” or “Expected ')'” type errors. To avoid these errors string encoding has to be done.

In .Net framework 4 a new method has been introduced to cater these types of errors under the System.Web.HttpUtility namespace called HttpUtility.JavaScriptStringEncode. This method does the encoding and injects necessary escape characters.

As an example, to show an alert which includes single quotes we have to use the encoding.


  string message = "The value 'x' is not allowed";

  ScriptManager.RegisterClientScriptBlock(this, this.GetType(), "Error", string.Format("alert('{0}');", message), true); // This will give an error

  ScriptManager.RegisterClientScriptBlock(this, this.GetType(), "Error", string.Format("alert('{0}');", HttpUtility.JavaScriptStringEncode(message)), true); // JavaScript encoding has been done.


Monday, February 18, 2013

ASP.Net client side validation using Page_ClientValidate


ASP.Net client side validation using Page_ClientValidate
In typical web forms validators such as required field validators, regular expression validators, etc. are using with regular asp.net controls. With validation groups part of the controls in the web form can be validate. But with some of client events such as ‘OnClientClick’ those validations may not work as intended.  In such scenarios some mechanism has to use to check the validity of the validators to avoid unnecessary post backs. For achieve this java script Page_ClientValidate() function can be used.\\
 
Page_ClientValidate() function returns true or false based on the validity of the validators in the web form.


e.g :-
   if(retValue != null && Page_ClientValidate()){  //retValue is some variable
      return true;
   }
   else{
     return false;
   }
</ code>

Page_ClientValidate function can be used to validate controls which are belong to a validation group only.


e.g :-
   if(retValue != null && Page_ClientValidate('theGroup')){  //thGroup is a validation group
      return true;
   }
   else{
     return false;
   }


Tuesday, December 25, 2012

Replace window.showModalDialog with window.open

showModalDialog method supports most of the modern browsers. But in some browsers such as safari browser in iPad does not support showModalDialog method simply because they don’t have a concept of popup windows. So if a system needs to support to view in iPads showModalDialog method needs to be replaced with another method. The closest method is the window.open method, but this method has major limitations comparing to window.showModalDialog method.

The major difference between these two methods is showModalDialog halts the executions of the JavaScript until the dialog box is closed and can get a return value from the opened dialog box when its closing. In contrast window.open just opens a window asynchronously (User can access both the parent window and the opened window). And the JavaScript execution will continue immediately. 

To replace showModalDialog with window.open there is no easy way to do this. But with some limitations window.showModalDialog method can be replaced with window.open method.

To implement the functionality of getting return value from the dialog box normal JavaScript execution has to be divided into two deferent phases.

Phase 1 – JavaScript execution until the dialog box is open.
Phase 2 –JavaScript execution after the return value is been returned from the dialog box. 
Let’s take a simple JavaScript function as follows.

function openNewWindow() {
            var ModalWidth = "100px";
            var ModalHeight = "500px";
            var retValue = window.showModalDialog(urlPath, arrArguments, "dialogWidth:" + ModalWidt +";dialogHeight:" + ModalHeight + ";center:yes;help:no;resizable:no;status:no;scroll:no");

      if (retValue != null || retValue != "") {
             alert(retValue);
        }
        else {
             alert('No value returned');
        }
}

In the above example first of all we need to divide it to two main functions.

Phase 1
Let’s take a simple JavaScript function as follows.

function openNewWindow() {
            var ModalWidth = "100px";
            var ModalHeight = "500px";
            var retValue = window.showModalDialog(urlPath, arrArguments, "dialogWidth:" + ModalWidt +";dialogHeight:" + ModalHeight + ";center:yes;help:no;resizable:no;status:no;scroll:no");
}

Phase 2
function callback(retValue){
    if (retValue != null || retValue != "") {
             alert(retValue);
        }
        else {
             alert('No value returned');
        }
}

The callback function is the function which is going to call when the child window is getting closed. So the child window calls a function in parent window when the window is getting closed.  We can use Jquary unload method to bind a window unload event. So the unload event calls a callback function when the window is getting closed. But there is a limitation here, this window unload event will fires when the full post back occur in the child window. To avoid this, update panels have to be used to implement partial post backs.  The bottom line is, the window unload event should trigger only when the window is actually closing.  Following code lines shows how we can implement the window unload event.

var childWindow = window.open(urlPath,"","toolbar=no, directories=no, location=no, status=yes, menubar=no, resizable=yes, scrollbars=no, width="+Width+", height="+Height);
   
    $(childWindow).unload(function(){
            //We use isOpened propoerty to see whether the "unload" event is being called for the second time.
            //On the first time, isOpened is not defined, so we don't call the callback on that occassion.
            //In the second time, isOpened is defined, so can call the callback function.
            if (childWindow.isOpened == null) {
                childWindow.isOpened = 1;
            }
            else {
                if(callback){
                    callback(childWindow.returnValue);
                }
            }
      });
In this example a parameter called isOpened is used to avoid triggering unload event when the page loads. Here callback is the function which needs to call when the window getting closed and which is in the parent window.

Let’s consider the phase 1 again. In here we need to call the window.open, and also we need to preserve the normal execution of the code as previously in the browsers which showModalDialog supports.


function openNewWindow() {
            var ModalWidth = "100px";
            var ModalHeight = "500px";
            var retValue = openDialogBox(width,hight,callback);
           
            //To preserve the normal JavaScript execution
            if(window. showModalDialog){
                callback(retValue);
          }
 }

function callback(retValue){
    if (retValue != null || retValue != "") {
             alert(retValue);
        }
        else {
             alert('No value returned');
        }
}

We will implement a generic method to open the new window.

function openDialogBox(width,hight,callback){

     if(window. showModalDialog){
          retValue = window.showModalDialog(urlPath, arrArguments, "dialogWidth:" + width +";dialogHeight:" + hight+ ";center:yes;help:no;resizable:no;status:no;scroll:no");
     }
     else{
        windowUnloadEvent(width,height, callback);
    }
}


function windowUnloadEvent(width,height, callback){
    var childWindow = window.open(urlPath,"","toolbar=no, directories=no, location=no, status=yes, menubar=no, resizable=yes, scrollbars=no, width="+Width+", height="+Height);
   
        $(childWindow).unload(function(){
            //We use isOpened propoerty to see whether the "unload" event is being called for the second time.
            //On the first time, isOpened is not defined, so we don't call the callback on that occassion.
            //In the second time, isOpened is defined, so can call the callback function.
            if (childWindow.isOpened == null) {
                childWindow.isOpened = 1;
            }
            else {
                if(callback){
                    callback(childWindow.returnValue);
                }
            }
        });
}

By using above method we can simply replace the showModalDialog with window.open, but sometimes there should be a server side event also trigger after the client side event. To achieve this we need to do the post back by force and to trigger the appropriate server side event we need a sender element. So we need to pass the sender also.

  function openNewWindow(sender) {
            var ModalWidth = "100px";
            var ModalHeight = "500px";
            var retValue = openDialogBox(width,hight,callback,sender);
           
            //To preserve the normal JavaScript execution
            if(window. showModalDialog){
      return  callback(retValue);
            }
 }

function callback(retValue,sender){
    if (retValue != null || retValue != "") {
                 alert(retValue);

// sender null implies normal JavaScript execution
              if(sender == null){
        retuen true;
}
setTimeout(function () { __doPostBack(getElementDynamicName(sender), ''); }, 500); // forcely doing the post back

        }
        else {
             alert('No value returned');
        }
}

function openDialogBox(width,hight,callback,sender){

     if(window. showModalDialog){
    retValue = window.showModalDialog(urlPath, arrArguments, "dialogWidth:" + width +";dialogHeight:" + hight+ ";center:yes;help:no;resizable:no;status:no;scroll:no");
     }
     else{
       windowUnloadEvent(width,height, callback,sender);
    }
}


function windowUnloadEvent(width,height, callback,sender){
    var childWindow = window.open(urlPath,"","toolbar=no, directories=no, location=no, status=yes, menubar=no, resizable=yes, scrollbars=no, width="+Width+", height="+Height);
   
        $(childWindow).unload(function(){
            //We use isOpened propoerty to see whether the "unload" event is being called for the second time.
            //On the first time, isOpened is not defined, so we don't call the callback on that occassion.
            //In the second time, isOpened is defined, so can call the callback function.
            if (childWindow.isOpened == null) {
                childWindow.isOpened = 1;
            }
            else {
                if(callback){
                    callback(childWindow.returnValue,sender);
                }
            }
        });
}
The reason for using the setTimeout function, sometimes the form element is not initialized properly at the time the callback function calls(this step only need in low processing power devices only such as iPads). 

Tuesday, June 19, 2012

Remove Commas from WebNumericEdit


When using Infragistics WebNumericEdit, unnecessary commas have to be removed to use this control as a general numeric control. This format is inherited from NumberFormatInfo class, in order to modify this behavior new instance on this class has to be created and set the NumberGroupSeparator property. WebNumericEdit control has the propery called Culture, so a new CultureInfo object can be assign with the required  NumberGroupSeparator. Following code snippet can be use to achieve required behavior.

//C#
using System.Globalization;

// In the page load event
CultureInfo culInfo=new CultureInfo("en-US");  //instance of CultureInfo class

NumberFormatInfo numFromatInfo = new NumberFormatInfo();  // instance of NumberFormatInfo class
numFromatInfo.NumberGroupSeparator= string.Empty;  //set NumberGroupSeparator any string you want

culInfo.NumberFormat=numFromatInfo;

this.WebNumericEdit1.Culture = culInfo; //WebNumericEdit1 is the control to be applied with the new number format

 
This code has to be in the page load event and has to be called in the post backs also .

Wednesday, June 13, 2012

Creating a Multi-Text DropDownList from general ASP.NET DropDownList

In some projects there may be a requirement to bind multiple data fields with some pattern as the datatextfield such as "Name - Address". To achieve this requirement new column can be added to the datatable before bind data to the dropdownlist. Following C# code can be use to achieve this requirement.

DataColumn newColumn = new DataColumn("AddedColumn"); // Create a new data column
newColumn.Expression = "Name + ' - ' + Address"; //Name and Address are columns in datatable
dtData.Columns.Add(newColumn); //dtData is the datatable

ddDropDownList.DataTextField = "AddedColumn";

ddDropDownList.DataSource = dtData;
ddDropDownList.DataBind();

Like this any formatted string can be created using data table columns and bind to the DropDownList as the DataTextField. 


showModalDialog not returning value after a postback in Chrome

There is a bug in the Chrome browser engine, which is showModalDialog fails to return window.returnValue after childpage do any postback. This issue has been there for long time and status of the this issue is still available. More information on this issue can be found here.

For a solution for this issue update panels can be used to avoid unnecessary postbacks but this solution is not extendable for all the scenarios. The best solution posted in the stackoverflow can be found here.  What has done in this solution is, it uses the window.operner return value to get the return value in the Chrome. After postbacks also window.opener property in the modal dialog points to the caller window, so the result can be directly set to the returnValue property of the caller window(parent window).

Monday, May 7, 2012

Disable auto run in Windows XP Home Edition

Have you every try to disable autorun in Windows XP Home edition, If you use a common way using Gpedit.msc you will end up like this.

Have you ever seen this message and stuck with this. Windows home edition does not contain this option, So Gpedit.msc cant be used for disabling auto run in XP Home Edition. You have to do it in the registry editor. 

Back to hardware mode... :)

Here are the steps you have to follow.... (Note: please backup the registry before you proceed)
  1. type regedit and go to - HKEY_CURRENT_USER\SOFTWARE\Microsoft\Windows\CurrentVersion\Policies\Explorer   

                                     
  2. Locate the DWORD value with the name "NoDriveTypeAutoRun", if this value is not there you have to create a new one with the exact same name. To do that right click on the pane -> new -> DWORD value.
  3. Change the value data to - 0x000000b1 (177)
                         

Tuesday, May 1, 2012

Collation conflict in T-SQL

Have you ever encounter a problem when working in T-SQL like, "Cannot resolve the collation conflict between "XX_90_CI_AI" and "SQL_Latin1_General_CP1_CI_AS" in the UNION operation." The reason for this error message is collation conflict has been occurred while SQL server trying to compare two columns or expressions which have different collations. This error cause most of the time when compare columns with a temporary table column, because other table columns are in the database default collation settings and temporary tables may not in the default collation. 

As I experienced to overcome this problem we can simply apply collation setting for the tempary table column with default collation settings as follows

Colname COLLATE DATABASE_DEFAULT from #temp


Tuesday, March 27, 2012

Operation is not valid due to the current state of the object.

Some times when using .NET web applications you have came a cross yellow pages with the stack trace some thing like bellow. 

System.InvalidOperationExceptionOperation is not valid due to the current state of the object.
System.InvalidOperationException: Operation is not valid due to the current state of the object.
at System.Web.HttpRequest.FillInFormCollection()
at System.Web.HttpRequest.get_Form()

Reason for this exception is a recent update which has been done to the .NET framework.  In the Microsoft security update MS11-100, they limit the maximum number of form keys to 1000 in a HTTP request. Because of this update ASP.NET applications rejects the requests which have more than 1000 of form keys. So the error message will be displayed in the browser, with HTTP 500 status code.

This change was made to address mainly the Denial of Service vulnerability. 

This new limit can be override on a per application basic by putting a new "appSettings" in an ASP.NET application’s configuration file. 

Thursday, March 22, 2012

Remove New Line charactors from data in SQL

Some times we need to avoid newline characters and other characters such as tab from the data we retrieve from the SQL server. There is a easy way to do this, we just need to replace those characters with a space or what ever we need as follows.

declare @newLine char(2)
set @newLine = char(13) + char(10)

which is in SQL :
char(9) -  Tab
char(10) - Line feed
char(13)  - Carriage return

then we can directly replace these characters when ever we need.

e.g :-
select
replace(theDataBaseField,@newLine,' ' ) 
from.....

as above we can get data without any newline characters.

Saturday, January 8, 2011

Start Tomcat 6.X in Debug Mode in Windows

To start tomcat in debug mode first there are two system environment variables to set

  • variable name : JPDA_TRANSPORT, variable   value = dt_socket
  • variable name :  JPDA_ADDRESS, variable  value = 8000 (any free port)


Then open command prompt with administrator privileges and change the dilatory to Tomcat bin folder. Then start tomcat using "catalina.bat jpda start command". Now tomcat will start in debug mode. You have to use port which we set on JPDA_ADDRESS in the IDE you use for debugging. For example in eclipse 

Acrobat 9 Pro not accepting EULA

I have installed acrobat pro 9 on windows 7 and I have used it for a while. Suddenly the an End User License Agreement comes up and I was not able to accept, reject or cancel it, the an End User License Agreement comes up was there at the top and I couldn't use Acrobat reader.

 Nothing happens when click on any button.

I tried many thing to fix this issue. even I edit the registry also. But nothing helped.

As I mentioned in my previous post after resetting the Internet Explore setting this problem also solved. Now I can use acrobat reader without any problem.  

Tuesday, January 4, 2011

Solution for one problem be came a solution for many problems

In my previous post "I Couldn't Open Executable Files In Windows 7" I have mentioned about resetting Internet explorer settings resolve an error on my laptop. Remarkably this solution be came a solution for two other problems as well.

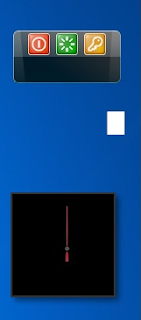
Previously I have post about the problem I have faced with my desktop gadgets and the solution I have found. But I had some problems with my calendar till I fix above problem. My calendar was an empty box.


But after resetting Internet explorer settings, calender was started to display correctly.


Serious Problem with Adobe Acrobat 9 Pro also solved. I will write about this later in a new post.

Saturday, January 1, 2011

I Couldn't Open Executable Files In Windows 7

Recently in my laptop, when I'm going to run executable files a message appeared saying that "These files can't be opened".

Some startup programs all so stopped loading, when windows starring some services are not get loaded because they are prevented loading by some thing windows security related problem, I couldn't realized what was going on.

This problem became more and more critical with time, even I couldn't run a new task above massage was appeared preventing run new task. It was getting weird, imaging a situation where you can't run executable files in windows.

So I tried following the instructions which given under the link at the bottom of the error message "Why can't these files be opened ?", but it didn't help for me.

I had a suspiciousness that a virus may cause these problems, so I ran full system scan several times. But I was wrong, no virus was found in my computer. This is getting worst day by day even I can't execute fixers which can downloaded from Microsoft web site. I was so helpless, I lost several important applications because of this error, the most suffering thing was the application for my touch pad doesn't work because of this damn error. I had lost all shortcuts I used with my touch pad.

I found some solutions on the internet in Microsoft answers web site.
But non of these solutions helped me. By that time I found another problem, that I can't change User Account Control settings. When I'm going to change UAC settings nothing happened when I click on the OK button, non of the changes got applied.

This step was a part of one of the solution. So I got mad and mad and mad...... So I decide to format the laptop and reinstall windows. Then I have to install all other applications and setting them for my works, ohhhh that is weird and time consuming.

After deciding to format, I was curious about one another solution. So I did it. Phew that was my lucky solution for the error. Only I had to do is reset Internet explorer settings. Such a small step resolves all problems. I did several critical things before such as editing registry for this error. I can't imaging such a small step resolves such a big but not much big as I thought problem.

Here is the proceeder to reset Internet explorer settings.

Open Control Panel -> Open Internet options-> Select Advanced tab, in there reset button can be found. Just click on the magic button and let the magic happens.


Now I can run any executable file without any problem and change User Account Control Settings.
I knew that windows can not be such a awkward operating system.

Monday, December 27, 2010

Change Windows 7 Login Screen Background

Have you tried to change the login screen in Windows 7?. You may faced lot of problems by using third party tools. I found a way to change the login screen background without using a third party tool. In this procedure you have to change windows 7 registry.

NOTE : Backup your registry before change any thing. this step is a must, in case of fatal error we can restore registry to the previous state.

Follow these steps
  1. Open windows registry editor.
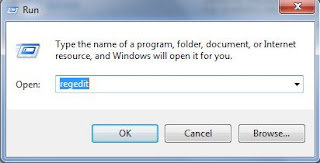
    To open registry editor, open run type "regedit" and press enter
  2. Backup registry To backup registry click file from the menu and select Export
  3. Save the backup file in a convenient location.
  4. Navigate to the following key HKEY_LOCAL_MACHINE\Software\Windows\CurrentVersion\Authentication\LogonUI\Background
    find the key "OEMBackground"

      If the key OEMBackground is not there create a new key named OEMBackground tocreate new key right click on the empty space in the right pane and create a new DWORD key.

    1. Change "Value data" of the key OEMBackground

      Right click on the key OEMBackground and click on the modify.

      set value to 1 and click OK.

    2. Close the registry editor.
    3. Now navigate to the Windows folder and open the folder System32\oobe
      now navigate into the folder "Info", (if its not there create a new folder and named is as "Info"). then navigate or create a folder named "backgrounds" in the folder "Info".

    4. Copy the image which you like most to the folder "backgrounds" and rename it as "backgroundDefault".size of the image should be the screen resolution (otherwise it will get stretch) and it should be in the format JPEG .
      NOTE : maximum size of the image should 256KB. Restart the computer and enjoy your most favorite image as the login screen.
    Restore the registry if something goes wrong. To restore registry open registry editor (step 1)and navigate file -> import. then select the backup registry file to restore.

    Enjoy Windows

    Saturday, December 25, 2010

    Windows 7 gadgets stopped displaying correctly

    Suddenly desktop gadgets stopped displaying correctly in my lap top. I’m using windows 7 professional (32 bit). This problem occurred after I install new windows updates and updating Skype. I’m not sure which the reason was.

    After googling for a while I realized that many windows 7 users had faced this problem, followings are several solutions which I found on different web sites but any of these didn’t solve my problem.

    Solution 1 – re-register concerned dll files of Windows gadgets
    Open command prompt with administrator permissions. (Administrator permissions are essential for run system command in windows 7)
    Change directory to windows/ system32
    Run following command one by one and press enter
    regsvr32 msxml3.dll

    regsvr32 scrrun.dll

    regsvr32 jscript.dll

    For each dll file message should popup to indicate whether registering those dll files are successful or not.


    Solution 2 - Reinstalling Windows Gadget Platform.
    To reinstall gadget platform we have to open “Programs and Features” in control panel, then select “Turn windows features on or off” from the left pan
    el. Then deselect the combo box Windows Gadget Platform. Then restart the computer and install Windows Gadget Platform.


    Neither one of above solutions didn’t help out for me. Finally I found the solution.

    Deleting the zones settings in windows registry fixed the issue.
    Open registry editor by running the command regedit. And navigate to the following key and delete the Zones key and then restart the computer.
    HKEY_CURRENT_USER\Software\Microsoft\Windows\CurrentVersion\Internet Settings


    Still the calendar is not working properly

    Sunday, March 21, 2010

    Don't have a DVD drive?, it won't be a problem any more

    Most of the Operating Systems are now come in a DVD Rom, then if any one doesn't have a DVD Rom Drive, installing those operating systems will be a problem. Some body may want to barrow a DVD Drive from somebody.

    Windows 7 provide a remarkable tool to preparing USB flash drive to install windows 7 in your PC. You don't won't a DVD Drive, and it is much easier to carry a USB thumb drive than a DVD.

    The tool which provide this facility in windows 7 is diskpart tool,it's a disk partitioning utility and windows 7 install this tool while installing the operating system. To prepare your USB thumb drive follow these steps.

    Open command prompt (hope every body know where to find command prompt in windows :)) and then just type diskpart and hit enter. diskpart tool will open.

    Then first you have to select your USB thumb drive. be careful with this otherwise you will lose your data in your own hard disk. type list disk to see all disks available.

    select your thumb drive by typing select disk + disk no as display on the tool window, be careful with this.

    Then run clean, this will remove file system on your thumb drive.

    Then you have to create primary partition on your thumb drive and active it. just type create partition primary and then active.

    Then you need to set up the Fat 32 file system by running format fs = fat32 (format fs = fat32 quick if you need a quick format).


    Then you can copy everything from the Windows 7 installation DVD onto the USB key (a simple drag and drop will do).

    Then restart the computer and select thumb drive from the Boot Menu.

    OS will install as normal as when you install it using a DVD.

    Saturday, March 20, 2010

    Making OpenOffice Add-On go easier

    There is a plugin for Netbeans to develop Add-on for OpenOffice, no need to bother about coding a Add-on, only you have to bother is what Add-on do and how to code them. Netbeans provide facility to develop Add-on, test coded add-on in OpenOffice directly and debug them.


    But there is one thing you have to install openoffice.org SDK development kit in your system and openoffice too :). http://download.openoffice.org/sdk/index.html.


    All setting can be of the add-on can be done while creating it like define user commands.


    After you click Finish, the wizard creates two configuration files and a Java class.The AddOns.xcu configuration file includes the add-on parameters, and ProtocolHandler.xcu defines the protocol handler configuration. Protocol handlers are part of OpenOffice.org dispatch framework; they bind user-interface controls, such as menu or toolbar items, to the functionality of penOffice.org. Everything reachable through the user interface is described by a command URL and corresponding parameters.

    The structure of the ProtocolHandler.xcu file defines a namespace for the add-on, All commands
    defined by the same addon use this namespace.

    The dispatch() method is where user code is begin to code. As a example from dispatch() method we can call another class or method.

    Following is a example code where insert "Hello World" to the document.