Sunday, July 21, 2013

How to Create Wireless Ad hoc / Access Point in Windows 8

In windows 8 creating ad hoc or access point is not available in the OS, but there is a paid app in Windows App store called Wi-Fi Hotspot Creator Assistant. But no need to purchase this app to create a new Wi-Fi hotspot, because the creating an Ad Hoc is still available inside the core of the Windows, but it’s not available in GUI.

Here are the steps to create an Ad Hoc network.

  1. First open up the windows command prompt with administrator privileges. To do so search for “cmd” and right-click on it then select run as administrator from below options.

  2. Then you have to check whether the network card supports ad hoc networks to do soo run this command >netsh wlan show driver, then look at line Hosted network support

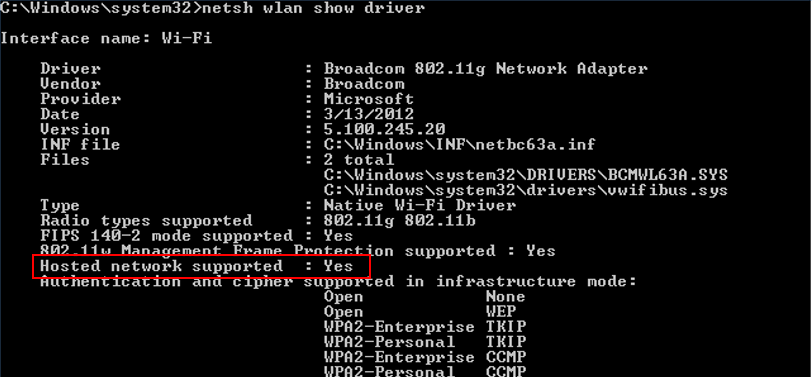
    If your network car support ad hoc then proceed with next step.

  3. Now enter following command line. Note: change the markup tags as your wish.

    netsh wlan set hostednetwork mode=allow ssid=<enter_ name_for_network>key=<enter_passowrd_here>
    • ssid- Name of the network
    •  key- passcode
  1. As the final step to start the connection enter this command netsh wlan start hostednetwork. Now you have done with creating ad hoc network
    If you having problem with starting the connection, just go to the Device manage and check whether the virtual wifi adapter is enabled under Network adapters.
    This wi-fi hotspot can be used to share the internet connection. 

    You can simply use this bat file to create a connection- Download here 

Wednesday, February 20, 2013

Replaces invalid XML characters in a string with their valid XML equivalent


Sometimes when creating XML documents with user specific data, string values of the XML nodes have to be encoded to maintain the structure of the XML nodes. Following table shows invalid XML characters and their escaped equivalent.

Invalid XML Character
Escaped equivalent
“<”
"<"
“>”
">"
“\””
"""
“\’”
"'"
“&”
“&"


There is a build-in method in .NET to achieve this called SecurityElement.Escape under the system. Security namespace.  This method accept string parameter and returns a string with invalid characters replaced.

e.g :-
      string xml = "\"node\"&"; 
      string encodedXml = System.Security.SecurityElement.Escape(xml);
      //RESULT: <node>"node"&<node>


Tuesday, February 19, 2013

How to encode JavaScript string to escape characters such as single quotes in .NET


When registering JavaScript functions or calling JavaScript functions from code behind there might me some specials characters such as single quotes, new line characters. These kinds of characters will causes for errors such as ” Unexpected identifier” , “Unterminated String constant” or “Expected ')'” type errors. To avoid these errors string encoding has to be done.

In .Net framework 4 a new method has been introduced to cater these types of errors under the System.Web.HttpUtility namespace called HttpUtility.JavaScriptStringEncode. This method does the encoding and injects necessary escape characters.

As an example, to show an alert which includes single quotes we have to use the encoding.


  string message = "The value 'x' is not allowed";

  ScriptManager.RegisterClientScriptBlock(this, this.GetType(), "Error", string.Format("alert('{0}');", message), true); // This will give an error

  ScriptManager.RegisterClientScriptBlock(this, this.GetType(), "Error", string.Format("alert('{0}');", HttpUtility.JavaScriptStringEncode(message)), true); // JavaScript encoding has been done.


Monday, February 18, 2013

ASP.Net client side validation using Page_ClientValidate


ASP.Net client side validation using Page_ClientValidate
In typical web forms validators such as required field validators, regular expression validators, etc. are using with regular asp.net controls. With validation groups part of the controls in the web form can be validate. But with some of client events such as ‘OnClientClick’ those validations may not work as intended.  In such scenarios some mechanism has to use to check the validity of the validators to avoid unnecessary post backs. For achieve this java script Page_ClientValidate() function can be used.\\
 
Page_ClientValidate() function returns true or false based on the validity of the validators in the web form.


e.g :-
   if(retValue != null && Page_ClientValidate()){  //retValue is some variable
      return true;
   }
   else{
     return false;
   }
</ code>

Page_ClientValidate function can be used to validate controls which are belong to a validation group only.


e.g :-
   if(retValue != null && Page_ClientValidate('theGroup')){  //thGroup is a validation group
      return true;
   }
   else{
     return false;
   }


Tuesday, December 25, 2012

Replace window.showModalDialog with window.open

showModalDialog method supports most of the modern browsers. But in some browsers such as safari browser in iPad does not support showModalDialog method simply because they don’t have a concept of popup windows. So if a system needs to support to view in iPads showModalDialog method needs to be replaced with another method. The closest method is the window.open method, but this method has major limitations comparing to window.showModalDialog method.

The major difference between these two methods is showModalDialog halts the executions of the JavaScript until the dialog box is closed and can get a return value from the opened dialog box when its closing. In contrast window.open just opens a window asynchronously (User can access both the parent window and the opened window). And the JavaScript execution will continue immediately. 

To replace showModalDialog with window.open there is no easy way to do this. But with some limitations window.showModalDialog method can be replaced with window.open method.

To implement the functionality of getting return value from the dialog box normal JavaScript execution has to be divided into two deferent phases.

Phase 1 – JavaScript execution until the dialog box is open.
Phase 2 –JavaScript execution after the return value is been returned from the dialog box. 
Let’s take a simple JavaScript function as follows.

function openNewWindow() {
            var ModalWidth = "100px";
            var ModalHeight = "500px";
            var retValue = window.showModalDialog(urlPath, arrArguments, "dialogWidth:" + ModalWidt +";dialogHeight:" + ModalHeight + ";center:yes;help:no;resizable:no;status:no;scroll:no");

      if (retValue != null || retValue != "") {
             alert(retValue);
        }
        else {
             alert('No value returned');
        }
}

In the above example first of all we need to divide it to two main functions.

Phase 1
Let’s take a simple JavaScript function as follows.

function openNewWindow() {
            var ModalWidth = "100px";
            var ModalHeight = "500px";
            var retValue = window.showModalDialog(urlPath, arrArguments, "dialogWidth:" + ModalWidt +";dialogHeight:" + ModalHeight + ";center:yes;help:no;resizable:no;status:no;scroll:no");
}

Phase 2
function callback(retValue){
    if (retValue != null || retValue != "") {
             alert(retValue);
        }
        else {
             alert('No value returned');
        }
}

The callback function is the function which is going to call when the child window is getting closed. So the child window calls a function in parent window when the window is getting closed.  We can use Jquary unload method to bind a window unload event. So the unload event calls a callback function when the window is getting closed. But there is a limitation here, this window unload event will fires when the full post back occur in the child window. To avoid this, update panels have to be used to implement partial post backs.  The bottom line is, the window unload event should trigger only when the window is actually closing.  Following code lines shows how we can implement the window unload event.

var childWindow = window.open(urlPath,"","toolbar=no, directories=no, location=no, status=yes, menubar=no, resizable=yes, scrollbars=no, width="+Width+", height="+Height);
   
    $(childWindow).unload(function(){
            //We use isOpened propoerty to see whether the "unload" event is being called for the second time.
            //On the first time, isOpened is not defined, so we don't call the callback on that occassion.
            //In the second time, isOpened is defined, so can call the callback function.
            if (childWindow.isOpened == null) {
                childWindow.isOpened = 1;
            }
            else {
                if(callback){
                    callback(childWindow.returnValue);
                }
            }
      });
In this example a parameter called isOpened is used to avoid triggering unload event when the page loads. Here callback is the function which needs to call when the window getting closed and which is in the parent window.

Let’s consider the phase 1 again. In here we need to call the window.open, and also we need to preserve the normal execution of the code as previously in the browsers which showModalDialog supports.


function openNewWindow() {
            var ModalWidth = "100px";
            var ModalHeight = "500px";
            var retValue = openDialogBox(width,hight,callback);
           
            //To preserve the normal JavaScript execution
            if(window. showModalDialog){
                callback(retValue);
          }
 }

function callback(retValue){
    if (retValue != null || retValue != "") {
             alert(retValue);
        }
        else {
             alert('No value returned');
        }
}

We will implement a generic method to open the new window.

function openDialogBox(width,hight,callback){

     if(window. showModalDialog){
          retValue = window.showModalDialog(urlPath, arrArguments, "dialogWidth:" + width +";dialogHeight:" + hight+ ";center:yes;help:no;resizable:no;status:no;scroll:no");
     }
     else{
        windowUnloadEvent(width,height, callback);
    }
}


function windowUnloadEvent(width,height, callback){
    var childWindow = window.open(urlPath,"","toolbar=no, directories=no, location=no, status=yes, menubar=no, resizable=yes, scrollbars=no, width="+Width+", height="+Height);
   
        $(childWindow).unload(function(){
            //We use isOpened propoerty to see whether the "unload" event is being called for the second time.
            //On the first time, isOpened is not defined, so we don't call the callback on that occassion.
            //In the second time, isOpened is defined, so can call the callback function.
            if (childWindow.isOpened == null) {
                childWindow.isOpened = 1;
            }
            else {
                if(callback){
                    callback(childWindow.returnValue);
                }
            }
        });
}

By using above method we can simply replace the showModalDialog with window.open, but sometimes there should be a server side event also trigger after the client side event. To achieve this we need to do the post back by force and to trigger the appropriate server side event we need a sender element. So we need to pass the sender also.

  function openNewWindow(sender) {
            var ModalWidth = "100px";
            var ModalHeight = "500px";
            var retValue = openDialogBox(width,hight,callback,sender);
           
            //To preserve the normal JavaScript execution
            if(window. showModalDialog){
      return  callback(retValue);
            }
 }

function callback(retValue,sender){
    if (retValue != null || retValue != "") {
                 alert(retValue);

// sender null implies normal JavaScript execution
              if(sender == null){
        retuen true;
}
setTimeout(function () { __doPostBack(getElementDynamicName(sender), ''); }, 500); // forcely doing the post back

        }
        else {
             alert('No value returned');
        }
}

function openDialogBox(width,hight,callback,sender){

     if(window. showModalDialog){
    retValue = window.showModalDialog(urlPath, arrArguments, "dialogWidth:" + width +";dialogHeight:" + hight+ ";center:yes;help:no;resizable:no;status:no;scroll:no");
     }
     else{
       windowUnloadEvent(width,height, callback,sender);
    }
}


function windowUnloadEvent(width,height, callback,sender){
    var childWindow = window.open(urlPath,"","toolbar=no, directories=no, location=no, status=yes, menubar=no, resizable=yes, scrollbars=no, width="+Width+", height="+Height);
   
        $(childWindow).unload(function(){
            //We use isOpened propoerty to see whether the "unload" event is being called for the second time.
            //On the first time, isOpened is not defined, so we don't call the callback on that occassion.
            //In the second time, isOpened is defined, so can call the callback function.
            if (childWindow.isOpened == null) {
                childWindow.isOpened = 1;
            }
            else {
                if(callback){
                    callback(childWindow.returnValue,sender);
                }
            }
        });
}
The reason for using the setTimeout function, sometimes the form element is not initialized properly at the time the callback function calls(this step only need in low processing power devices only such as iPads). 

Tuesday, June 19, 2012

Remove Commas from WebNumericEdit


When using Infragistics WebNumericEdit, unnecessary commas have to be removed to use this control as a general numeric control. This format is inherited from NumberFormatInfo class, in order to modify this behavior new instance on this class has to be created and set the NumberGroupSeparator property. WebNumericEdit control has the propery called Culture, so a new CultureInfo object can be assign with the required  NumberGroupSeparator. Following code snippet can be use to achieve required behavior.

//C#
using System.Globalization;

// In the page load event
CultureInfo culInfo=new CultureInfo("en-US");  //instance of CultureInfo class

NumberFormatInfo numFromatInfo = new NumberFormatInfo();  // instance of NumberFormatInfo class
numFromatInfo.NumberGroupSeparator= string.Empty;  //set NumberGroupSeparator any string you want

culInfo.NumberFormat=numFromatInfo;

this.WebNumericEdit1.Culture = culInfo; //WebNumericEdit1 is the control to be applied with the new number format

 
This code has to be in the page load event and has to be called in the post backs also .

Wednesday, June 13, 2012

Creating a Multi-Text DropDownList from general ASP.NET DropDownList

In some projects there may be a requirement to bind multiple data fields with some pattern as the datatextfield such as "Name - Address". To achieve this requirement new column can be added to the datatable before bind data to the dropdownlist. Following C# code can be use to achieve this requirement.

DataColumn newColumn = new DataColumn("AddedColumn"); // Create a new data column
newColumn.Expression = "Name + ' - ' + Address"; //Name and Address are columns in datatable
dtData.Columns.Add(newColumn); //dtData is the datatable

ddDropDownList.DataTextField = "AddedColumn";

ddDropDownList.DataSource = dtData;
ddDropDownList.DataBind();

Like this any formatted string can be created using data table columns and bind to the DropDownList as the DataTextField.