Monday, December 27, 2010

Change Windows 7 Login Screen Background

Have you tried to change the login screen in Windows 7?. You may faced lot of problems by using third party tools. I found a way to change the login screen background without using a third party tool. In this procedure you have to change windows 7 registry.

NOTE : Backup your registry before change any thing. this step is a must, in case of fatal error we can restore registry to the previous state.

Follow these steps
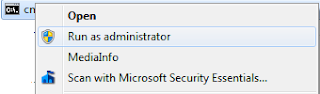
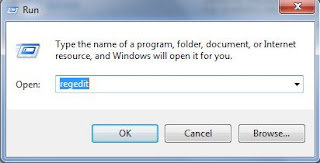
  1. Open windows registry editor.
    To open registry editor, open run type "regedit" and press enter
  2. Backup registry To backup registry click file from the menu and select Export
  3. Save the backup file in a convenient location.
  4. Navigate to the following key HKEY_LOCAL_MACHINE\Software\Windows\CurrentVersion\Authentication\LogonUI\Background
    find the key "OEMBackground"

      If the key OEMBackground is not there create a new key named OEMBackground tocreate new key right click on the empty space in the right pane and create a new DWORD key.

    1. Change "Value data" of the key OEMBackground

      Right click on the key OEMBackground and click on the modify.

      set value to 1 and click OK.

    2. Close the registry editor.
    3. Now navigate to the Windows folder and open the folder System32\oobe
      now navigate into the folder "Info", (if its not there create a new folder and named is as "Info"). then navigate or create a folder named "backgrounds" in the folder "Info".

    4. Copy the image which you like most to the folder "backgrounds" and rename it as "backgroundDefault".size of the image should be the screen resolution (otherwise it will get stretch) and it should be in the format JPEG .
      NOTE : maximum size of the image should 256KB. Restart the computer and enjoy your most favorite image as the login screen.
    Restore the registry if something goes wrong. To restore registry open registry editor (step 1)and navigate file -> import. then select the backup registry file to restore.

    Enjoy Windows

    Saturday, December 25, 2010

    Windows 7 gadgets stopped displaying correctly

    Suddenly desktop gadgets stopped displaying correctly in my lap top. I’m using windows 7 professional (32 bit). This problem occurred after I install new windows updates and updating Skype. I’m not sure which the reason was.

    After googling for a while I realized that many windows 7 users had faced this problem, followings are several solutions which I found on different web sites but any of these didn’t solve my problem.

    Solution 1 – re-register concerned dll files of Windows gadgets
    Open command prompt with administrator permissions. (Administrator permissions are essential for run system command in windows 7)
    Change directory to windows/ system32
    Run following command one by one and press enter
    regsvr32 msxml3.dll

    regsvr32 scrrun.dll

    regsvr32 jscript.dll

    For each dll file message should popup to indicate whether registering those dll files are successful or not.


    Solution 2 - Reinstalling Windows Gadget Platform.
    To reinstall gadget platform we have to open “Programs and Features” in control panel, then select “Turn windows features on or off” from the left pan
    el. Then deselect the combo box Windows Gadget Platform. Then restart the computer and install Windows Gadget Platform.


    Neither one of above solutions didn’t help out for me. Finally I found the solution.

    Deleting the zones settings in windows registry fixed the issue.
    Open registry editor by running the command regedit. And navigate to the following key and delete the Zones key and then restart the computer.
    HKEY_CURRENT_USER\Software\Microsoft\Windows\CurrentVersion\Internet Settings


    Still the calendar is not working properly

    Sunday, March 21, 2010

    Don't have a DVD drive?, it won't be a problem any more

    Most of the Operating Systems are now come in a DVD Rom, then if any one doesn't have a DVD Rom Drive, installing those operating systems will be a problem. Some body may want to barrow a DVD Drive from somebody.

    Windows 7 provide a remarkable tool to preparing USB flash drive to install windows 7 in your PC. You don't won't a DVD Drive, and it is much easier to carry a USB thumb drive than a DVD.

    The tool which provide this facility in windows 7 is diskpart tool,it's a disk partitioning utility and windows 7 install this tool while installing the operating system. To prepare your USB thumb drive follow these steps.

    Open command prompt (hope every body know where to find command prompt in windows :)) and then just type diskpart and hit enter. diskpart tool will open.

    Then first you have to select your USB thumb drive. be careful with this otherwise you will lose your data in your own hard disk. type list disk to see all disks available.

    select your thumb drive by typing select disk + disk no as display on the tool window, be careful with this.

    Then run clean, this will remove file system on your thumb drive.

    Then you have to create primary partition on your thumb drive and active it. just type create partition primary and then active.

    Then you need to set up the Fat 32 file system by running format fs = fat32 (format fs = fat32 quick if you need a quick format).


    Then you can copy everything from the Windows 7 installation DVD onto the USB key (a simple drag and drop will do).

    Then restart the computer and select thumb drive from the Boot Menu.

    OS will install as normal as when you install it using a DVD.

    Saturday, March 20, 2010

    Making OpenOffice Add-On go easier

    There is a plugin for Netbeans to develop Add-on for OpenOffice, no need to bother about coding a Add-on, only you have to bother is what Add-on do and how to code them. Netbeans provide facility to develop Add-on, test coded add-on in OpenOffice directly and debug them.


    But there is one thing you have to install openoffice.org SDK development kit in your system and openoffice too :). http://download.openoffice.org/sdk/index.html.


    All setting can be of the add-on can be done while creating it like define user commands.


    After you click Finish, the wizard creates two configuration files and a Java class.The AddOns.xcu configuration file includes the add-on parameters, and ProtocolHandler.xcu defines the protocol handler configuration. Protocol handlers are part of OpenOffice.org dispatch framework; they bind user-interface controls, such as menu or toolbar items, to the functionality of penOffice.org. Everything reachable through the user interface is described by a command URL and corresponding parameters.

    The structure of the ProtocolHandler.xcu file defines a namespace for the add-on, All commands
    defined by the same addon use this namespace.

    The dispatch() method is where user code is begin to code. As a example from dispatch() method we can call another class or method.

    Following is a example code where insert "Hello World" to the document.